I am a musician. At one point, during college, access to a set of drums and a place to play was not easy to come by. During this period, I discovered both electronic music and DJing which gave me the beat fix I needed. My DJing tapered off as drums became more readily available and my records were stashed, lost, or given away. Since those days, the emergence of computer based DJing has changed the way people DJ and, consequently, my interest has been re-kindled. Coincidentally, due to the tendency of my band to book long shows requiring us to provide some sort of itunes playlist during breaks, I’ve found a real reason to bother with it again as I’d much prefer a DJed mix to an IPod on shuffle.
I bought a copy of Native Instruments’ Traktor Pro DJ software which is definitely one of the best options for a computer-based DJ but I found that mixing with a mouse and keyboard is beyond frustrating. Definitely a far cry from the experience of using turntables and a mixer. I was motivated to record some mixes but, given that my need for easier control in no way justifies the cost of a DJ controller, my project stalled out.
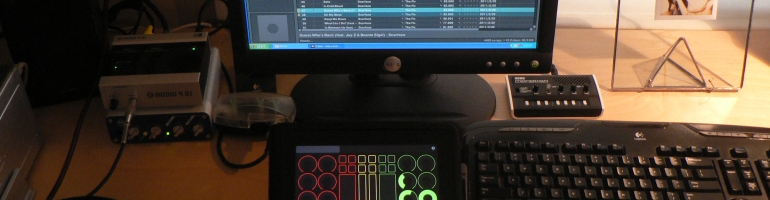
More recently, while browsing music related apps available for iPad, my newest addiction, I came across an application called TouchOSC which makes the iPad a customizable touch control surface to transmit OSC data via wifi to a computer that can then be converted into midi control messages and used to control music software.
 I was ecstatic to find this. Suddenly, for the price of $5, I have a controller for Traktor, Ableton, and pretty much any other music creation application I might use. Even if you factor in the cost of an iPad, it’s very promising that a single device can be so useful across different platforms, via customization, for so little money. Sure, a midi keyboard controller also offers the potential for cross-platform compatibility but, last I checked (and I manage a musical instrument retailer so I’m relatively current), you can’t just pop off a knob or fader and move it somewhere else on a keyboard.
The down side of this amazing technology is that its open-source nature and it’s age mean there isn’t a lot of standardization. It’s not very easy to set up and, based on posts in forums as well as my experience, there are lots of questions but few answers to overcome the barriers you’ll encounter. That was truly the inspiration for this blog in the first place as I realized that when I dig into a project like this, I end up spending hours or days sifting through forums, websites, and you tube videos to compile a working list of the steps required. Without fail, each node in my search is missing one or another crucial piece of information to complete the picture. It shouldn’t be that way.
As I walk through the steps I took, keep in mind that these apply to my set up and may not to others. I will however, make an attempt to keep it as broad in scope as possible. In my opinion, just having a curated list of links to pertinent information will likely save someone in the same boat hours, if not days of hair pulling and futile requests for help on a forum.
To begin, you must have some sort of touch screen wifi-enabled device such as an iPhone, iPod touch, iPad, Android phone, or Android tablet. TouchOSC can be found on the App Store or Android Market and costs $5 for apple and $0 for Android, at the time of writing. Note that the Android port is effectively a public beta so, though it works just as well as the Apple version, custom layouts are not yet supported so you’re limited to four bundled layouts provided by Hexler with the app.
Custom layouts, the key to tailoring the app to suit your music software can be had by creating them yourself or downloading them from various websites of other users who have created them, some free, others for relatively small fee. See the links below for some websites that host these. You will need to download the editor from Hexler’s website or by clicking this link, as you’ll need it to sync layouts to your device, even if you don’t intend to customize them yourself.
On the computer side, OSC requires software to accept the incoming control messages. Mac users can download Osculator which will translate the messages into data that is usable by your music software. Although I’m sure it requires some tweaking and some of the steps yet to be listed, I’ve not yet installed this on the MacBook so this post won’t cover this. For PC users, PureData Extended (PD) will need to be installed to accept the messages. Since PD doesn’t actually communicate directly with your music software, you will also need to download Midi Yoke to act as a virtual midi patch bay.
The final major component is having an open line of communication via wifi between your control device and your PC. You might as well complete these steps now as I imagine it’s satisfying to see your controller work upon finishing the configuration. It wasn’t setup in my case and it was somewhat annoying not to have it start working right away. To communicate on the network, you need to open a port in your wireless router settings so your device has a way to talk through the firewall, a process called port forwarding. If you use a bittorent client, you’ve probably had to do this before. If you don’t know how to login to your router’s settings, search the router manufacturer’s website for the IP address or URL that accesses the router and login. On the same website, there is probably a user manual that will guide you through the steps of granting program access to a specific port. Create a new setting and name it something like OSC or TouchOSC so you can later find it easily should you need to change the port being forwarded. Enter the incoming and outgoing ports, the easiest being TouchOSC’s default ports (8000 incoming and 9000 outgoing) save your new settings, and then logout of the router. Back at the PC, you’ll also need to grant access on these ports in your firewall settings: right click My Network Places > Properties > right click Local Area Connection> Properties> Advanced tab> Settings button for Windows Firewall> Exceptions tab> check applicable boxes.
Now with a free path of communication granted to OSC, you can setup the other programs. First, you should download a .pd file (available from Hexler’s site) that matches up with one of the stock layouts included with TouchOSC. You can play with others later, we’re just trying to get things going for now.
I began with the mix2 layout on my controller and downloaded the mix2-midi.pd file by Jeremy Stacy from Hexler.  You’ll be downloading a number of different types of files to make all of this work so now might be a good time to setup a single folder for them all so you’re not hunting for them later.
Run the PureData program, click File>Open>and browse to the folder you created and open your mix2-midi.pd file. This prepares PureData to accept the specific control messages output by that layout’s controls.
On your control device (iPad, etc.), open TouchOSC and go to settings to connect it to your computer. In the Network menu, you can click in the Host setting and either manually enter your PC’s ip address or, if TouchOSC detects the host automatically, it’ll appear at the bottom of the Network menu and you can  simply click the PC’s option. If the Outgoing and Incoming ports aren’t already set to 8000 and 9000 respectively, change them.

If, for whatever reason, you opted to forward different ports on your router, use those values of course. In the Layout setting, Mix 2 iPad was already loaded so I chose it.
In the midi options in PureData (Media> Midi Options), select Midi Yoke 1 for in and out. I had some confusion regarding this because of a backward description on the midi yoke website that led me to believe for a second that I couldn’t use “1” for both…

I would delve further into my thought process but I feel like it would make this even more confusing so I’ll say, if the midi yoke site confuses you, ignore it. As long as you aren’t running multiple devices through midi yoke, just stick to Midi Yoke 1 in your software midi settings and you should be good.
After configuring your PD patch, open your music software. On Traktor, you have two options for assigning a controller function to a parameter on the screen. There are .tsi files that store mapped controller settings which can be found on forums and various websites that preload specific mappings for specific TouchOSC layouts. For this, download a .tsi file that is configured for the TouchOSC layout you are using(probably available on the same page from which you downloaded the layout), open settings in Traktor and use the Import button to load the file. At this point, if you took this route, you should be able to see the controls you input on your touch screen reflected in movements of the faders, pots, and buttons on Traktor. I have yet to find .tsi files for the layout I’m using so I had to go the other route which requires mapping the controls to the functions myself.
Doing this is easy but time consuming as you’ll have to manually add a mapping for each function you want to control with TouchOSC. You simply choose “Add” in the mapping menu, choose the function you want to map to a control, and then move the control (push the button, move the slider or knob, etc.) on your touch screen. This should read the midi note number and save it as that function. There are other options for modifying the controller further but we’ll get to that later. Once I’ve spent some time with this myself (since starting this post, I’ve spent most of my time using TouchOSC with Ableton Live), I’ll update this post with my own mappings.
The potentially confusing thing at this point is deciding which control to map. Some things like crossfader and EQ controls are obvious but, with any layout you’ll find, there’ll be a ton of buttons available to control anything from loading a track from your library to creating a cue point or adjusting the pitch of the song. It would be beneficial to spend some time in the Traktor manual learning which functions do what as there are a bunch of different variations on cue/play functions, different looping functions, etc. and understanding all of the options is the key to customizing this controller to your needs. Chapter 15 in the Traktor Pro manual covers the various control settings pretty thoroughly.
Once you’ve created these mappings, they’ll remain in Traktor each time you open the program but it’s a good idea to save them as a .tsi file so you can pull them back up later. Do so by opening the preferences menu and clicking the EXPORT button at the bottom left of the window. You can later IMPORT the .tsi file, giving you the option of playing with new mappings without having to worry about re-setting them later, sharing them with other users (I’d love it if readers linked to them in the comments) and create mappings to use in different situations, for example one for stand-alone use, one for use with other controllers, etc.
With this information, not only do you now have the ability to control Traktor with your touchscreen device but you’re pretty much configured to interface with other music software using other layouts without much hassle.
Please feel free to share your own experiences, issues, questions, requests, and corrections to my steps in the comments.
Links to TouchOSC Layouts
http://www.djmoya.com/touchosc-templates-layouts/
http://androidosc.blogspot.com/
http://moderntat.blogspot.com/2011/03/touchosc-traktor-template.html
http://www.nativeinstruments.de/forum/showthread.php?p=818065
Related Links
http://www.intuitivebeats.com/tag/touchosc-midi-setup-tutorial/
http://www.djmoya.com/how-to-setup-touchosc/
http://createdigitalmusic.com/
http://www.youtube.com/watch?v=4qBXxQBGIk8&feature=player_embedded
http://www.native-instruments.com/forum/showthread.php?t=76384

Can you send your traktor settings for mix2ipad layout?
Hi Jonte. Thanks for the comment! I’ll post my .tsi in the next day or two.